Compressing images to reduce file size using FastStone Image Viewer
Compressing or re-compressing images can bring significant improvement in web-page load times. Outside the Internet, compressing images individually may not be worthwhile. Enter FastStone’s batch compression feature, it allows us to compress hundreds of images with a few clicks.
This article focuses more on JPEG files since JPEG compression settings are highly configurable in FastStone. A short section on PNG compression can be found here. It describes the PNG-8 option, which is a must try, even though it does not work for all images.
Contents
Compressing JPEG
Select the file you want to compress in the image browser and choose Save As from the File Menu. You could also use the keyboard shortcut CTRL+S
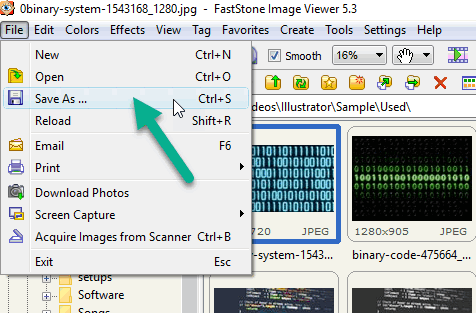
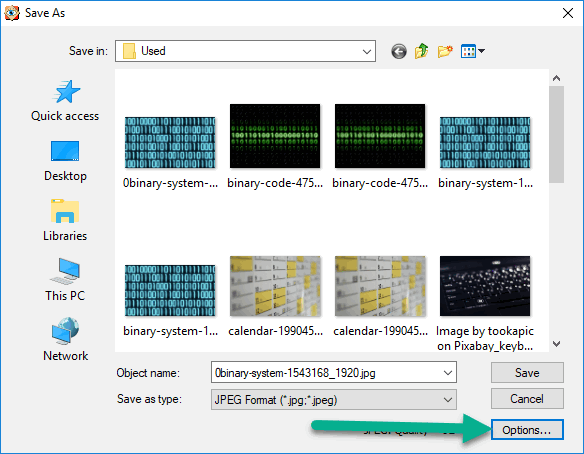
In the Save As dialog box, click on the Options button.
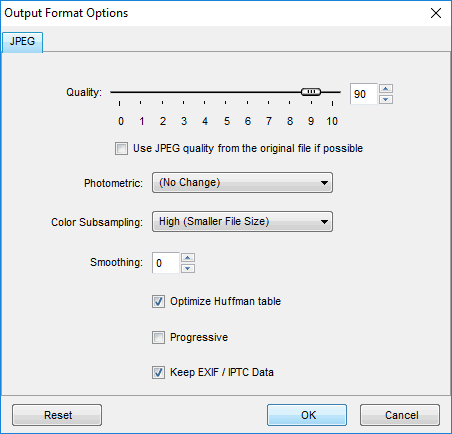
This opens the File Format Options window. This is where you can specify the compression settings.
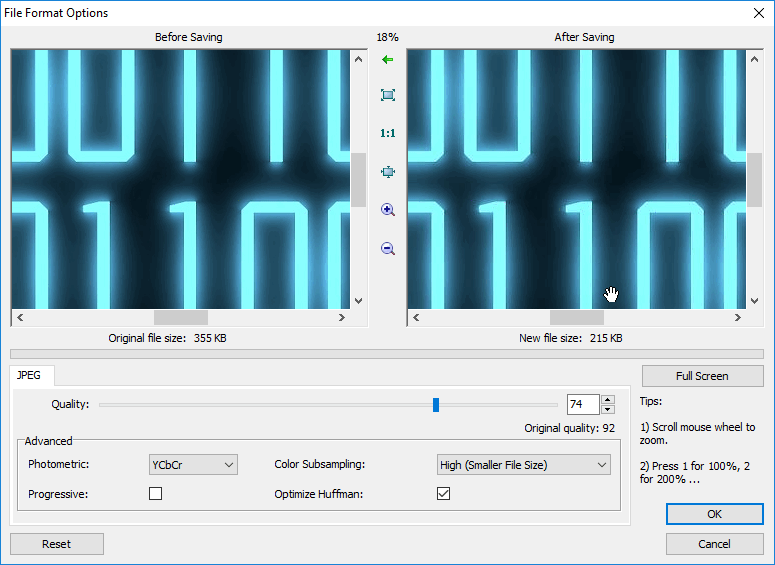
The main compression setting is the quality slider. Reduce the quality using this slider to reduce the file size. You will have to find an acceptable compromise between quality and file size. One feature I really love is that an estimate of the post-compression file size is shown. Watch out for the New file size label below the After Saving image on the right side. It might take a few seconds to update after you have adjusted the slider.
Once you are satisfied with the quality and the file size, click the Ok button. This would take you back to the Save As dialog box. Click the Save button to save the new compressed image.
Additional Options
Let us take a brief look at some of the other options available in the File Format Options window. There are image preview related options and compression options.
Image Preview
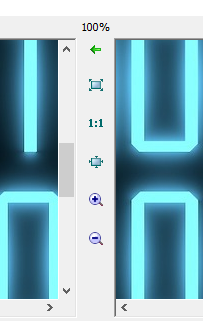
Between the two image previews, there is the pane shown below.
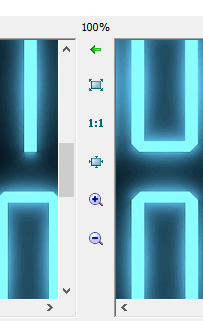
The purpose of this pane is to make visual comparisons between the original and the compressed images easier. When performing comparisons, it is highly recommended to use the Full-Screen option. This is the second option in the pane.
The first option in the pane, the green left-pointing arrow is a rather interesting and unusual option. Click and hold down the mouse button over the green arrow. The After Saving image will be shown overlaid over the Before Saving image. Try clicking, holding down, and releasing the mouse button over the green arrow multiple times. This allows you to recognize whether the image is changing too much as a result of the compression.
If you want to do a quick and dirty test to check out this feature, try moving the quality slider to a very low level. Then you can to clearly see the original image transforming into a very crappy looking image. After you have convinced yourself that the feature works, change the slider back to a reasonable level.
The remaining options in the pane are quite straight forward. The Actual Size option shows the images in their original size. The Fit to Window option automatically resizes the images to best fit the Window. Zoom in and Zoom out options are also available.
Compression Options
The Advanced panel at the bottom of the window allows you to tweak the compression settings further.

Color subsampling gives more importance to the brightness of the image than to its color. It relies on the fact that human eyes are more sensitive to small variations in brightness than to small variations in color. Color subsampling can reduce file sizes significantly. If you want high color accuracy, you could turn off this feature or reduce its scale to medium. But then you might end up with large file sizes or blocky images. You may have to experiment with this feature to see which works best for you.
The Optimize Huffman option does not lead to any loss in quality. However, it provides only a small reduction in file size. One problem with the Optimize Huffman option is that it might not work with some very old image decoders. It should be pretty safe for the web though.
The Progressive option deals with how an image loads on a webpage. If the image loads fast, you will not notice any difference between normal images and progressive images. A Normal JPEG is loaded line by line from top to bottom. The first horizontal line of pixels is loaded first, then the second line and so on until the last line. If the image loads slowly, the user will be able to see only the top part of the image at first. A progressive image always loads at its full size but might do so at a lower quality depending on the load speed. The image might look pixelated at first. The image quality would increase as more and more of the image loads. Coming back to our compression discussion; progressive images tend to have smaller file sizes than normal images.
In the Photometric option, the default YCbCr provides the best compression. That is ignoring the greyscale option which turns the image black and white.
Batch Compression
FastStone Image Viewer also has a batch compression feature. It is one of the many batch conversion features available. To access this feature, choose the option Batch convert selected images from the tools menu. You could also use the keyboard shortcut F3.
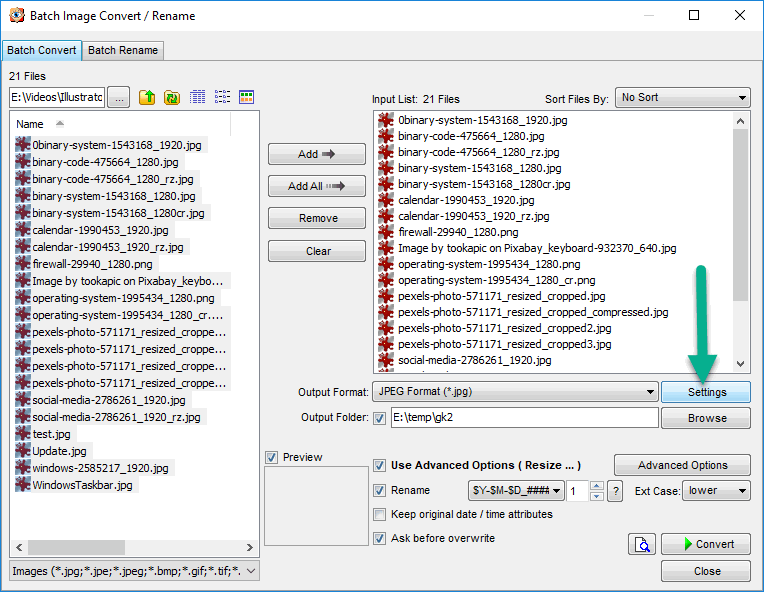
Choose the images you want to compress; then click the Settings button. This opens the Output Format Options window. This window is quite similar to the File Format Options window that we saw before. Some of the options like image preview or size estimates are not relevant for batch conversion, so they are not available here.
Compress vs Resize
The other option available to reduce the file size is to downsize/downscale the image. That is, to reduce the resolution of the image. It is usually not a good idea to deliver a very high-resolution image over the network and then ask the web browser to scale it down to fit the page better. There are exceptions like when the image is meant to be saved by the user. In most cases though, if the resolution of the image is too high, it would be better to reduce it in advance. After resizing, you can reduce the file size further using image compression. I have written an article here about batch resizing images using FastStone Image Viewer.
It is possible to resize and compress in one go using FastStone Image Viewer. The Batch Convert dialog box mentioned earlier has an Advanced Options button. This gives access to resize and many other options. If you are not interested in batch conversion, you can resize and compress individual images in FastStone. The steps are:
- Use the Resize/Resample option from the Edit menu to resize.
- Choose the Save As command, to save the resized image.
- This opens the same Save As dialog box which we saw earlier. As we have seen, you can use the Options button of this dialog box to specify compression settings.
Compress PNGs
PNG compression options are limited in FastStone. Most of the compression settings do not make any real impact on the file size. But if your image is PNG-24, you can achieve significant size reduction by converting it to PNG-8. PNG-8 works really well for simple images, which doesn’t use many colors.
The 8 in PNG-8 refers to the number of bits used to store color information. With 8 bits we can use 256 colors. Don’t let the low number put you off; PNG-8 does not use a fixed set of colors. Each PNG-8 image has its own color palette with up to 256 colors. PNG-8 supports all the colors which PNG-24 supports, as long as the number of colors in a single image does not exceed 256. Please note that in case of tiny images, PNG-8 might end up being bigger than PNG-24 because of the need to have a color palette included in the image.
Steps:
- File Menu ➾ SaveAs
- Click the options button.
- In the File Format window, choose 256 in the colors dropdown.
- Click the OK button.
- Enter a name for the new file and click the save button.
I have good experience with PNG-8 when it comes to screenshots. All the screenshots you see in this page are PNG-8 files created using FastStone. Here is a comparison.

In the above sample, the original image seems to have more than 256 colors because of the light effect, but still, the PNG-8 image came out alright.
PNG-8 does not work for photorealistic images, images with lots of gradients, etc. For such cases, here is a couple of other applications to consider. These applications are capable of reducing the size of both PNG-8 and PNG-24 files while maintaining the original color depth.