How to create a bootable Windows USB drive in Linux: Easy method
The easiest way that I found to create a bootable Windows USB in Linux is using a tool called Ventoy. Ventoy is a cross-platform, multi-boot USB creator. This means that you can boot from multiple ISOs using a single USB stick. It might seem complicated, but it is a simple two step process.
- Install Ventoy onto the USB drive
- Copy the ISO’s that you want to the USB drive
In my opinion a Ventoy multi-boot USB drive is something that most Linux users should have anyway. I have one with various Linux distros, Clonezilla etc. Being able to add the Windows ISO to it is a nice bonus.
Steps in detail
Download Ventoy
Download the Ventoy for Linux from here https://sourceforge.net/projects/ventoy/. Make sure to download the Linux version.
Extract Ventoy
Extract the contents of the archive file anywhere on your computer. You should be able to right-click on the file and choose the extract option.
Run Ventoy2Disk (Ventoy GUI)
Ventoy2Disk does not require installation on your computer. Just double-click on the executable to start it. For most cases that should be VentoyGUI.x86_64. The purpose of Ventoy2Disk is to install Ventoy on to your USB drive.
Choose your USB drive
Ventoy2Disk will try to automatically detect your USB drive. Make sure to choose the correct drive.
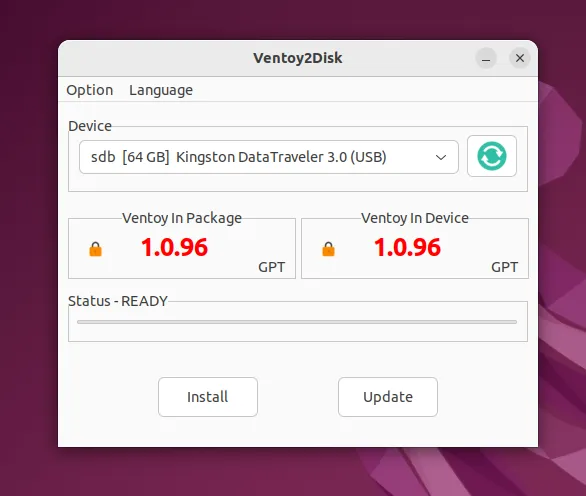
If you insert your USB drive after running Ventoy2Disk, you might have to click the green refresh button.
Choose a partition style
Next step is to choose a partition style.
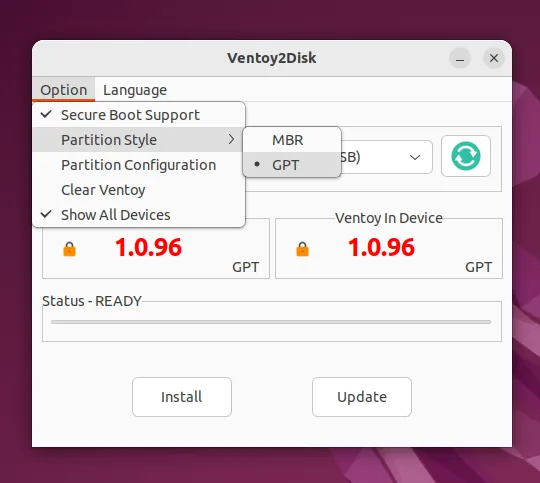
Ventoy works with both GPT and MBR. Which one to choose depends on your computer. GPT should work for most computers today. I think GPT became mainstream from about 2013. If your computer is older than that, you might have to use MBR.
Install Ventoy on USB drive
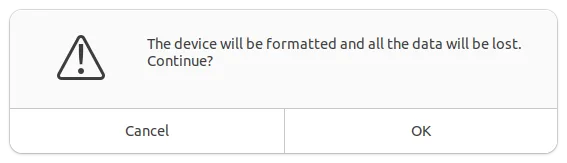
warning: Installing Ventoy will wipe the contents of the USB drive chosen. Make sure that you have chosen the correct drive. Also make sure that you have backed up all the contents of the drive
Click the install button to install Ventoy on your USB drive. You will see the following warning; probably multiple times. Click OK to continue
Your USB drive is now ready, time to copy some ISOs to it.
Download the Windows ISO
You can download the Windows 11 ISO from this page: https://www.microsoft.com/software-download/windows11
Copy the ISO to the Ventoy drive
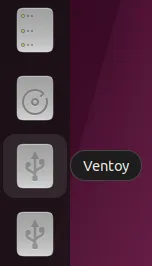
If you have selected GPT as the partition scheme, you might see two partitions. Choose the partition with the label Ventoy.
That is it, your USB drive can now boot Windows. When you boot from this drive, Ventoy will start first. It will then ask you to choose which ISO to boot from. Since we have added only the Windows ISO so far, only that will show up.
You can copy other ISOs to the USB drive at any time. To remove an ISO from the drive, just delete it.
Secure boot considerations
On some computers with secure boot enabled, Ventoy might refuse to boot. You can read more about it here: https://www.ventoy.net/en/doc_secure.html. In this case, you will have to disable secure boot. Please consult your motherboard/computer documentation for details regarding how.