KeePass Auto-Type guide
This article, takes a detailed look at KeePass’s Auto-Type feature. It is rather long, but it is essential information for using Auto-Type. After reading this, you will be able to get KeePass to work reliably on all or at least almost all input forms, including non-web forms.
The auto-type feature of KeePass, allows us to send a sequence of keystrokes to a target window. To auto-fill a form, it is not enough to send keystrokes for only the username and password. We will have to send some extra keys like TAB and ENTER as well. KeePass has a default key sequence that works for most input forms. The default sequence is: username, TAB , password, and ENTER, in that order. Custom key sequences are supported as well.
For auto-type to work, there is a need to match the target window with an entry in the KeePass database. There are two ways to select an entry. Manual selection is one option. The other is to use a global hotkey to trigger auto-type. In this method, KeePass tries to find an entry in the database which matches the currently active window. The hotkey option has some limitations, as we will see later, but when it works, it is almost as convenient as browser plugins like LastPass.
Contents
To take full advantage of the hotkey option, you need to learn the window name and custom key sequences options in KeePass. These features have some usefulness for those who want to go the manual route as well.
Partially automatic auto-type using manual entry selection
Let us say, your currently active window contains a login form. Perform the following steps to log in.
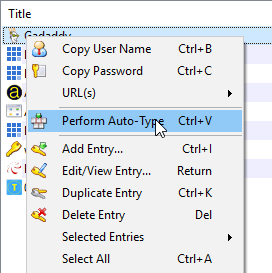
- Make the KeePass Window visible. You can use a global hotkey to activate the KeePass window. The hotkey isCTRL+ALT+K by default.
- Select the entry you want auto-typed.
- Choose the option: Perform Auto-Type from the context menu or use the keyboard shortcut CTRL+V.
KeePass will send the keystrokes to your login form.
There are a couple of points to take note of:-
- KeePass doesn’t know which of our windows is the target window. It minimizes itself when we choose auto-type. Then it sends the keystrokes to whichever window is active at that point. It is our responsibility to make sure that this window is the target window.
- Before opening the KeePass window, we have to select the first input box on the page. Usually, this is the username field. Most of the time this happens automatically when you load a login page.
Fully automatic auto-type using the global hotkey
KeePass auto-type can be triggered using a global hotkey. A global hotkey is a system-wide hotkey. It works regardless of which window is currently active. Open the target window, select its first input box and press the global hotkey. This is CTRL+ALT+A by default. KeePass would attempt to match the current window with an entry in the KeePass database. If it finds a match, It would send the keystrokes needed to the currently active window. The default hotkey might not work if it conflicts with an existing hotkey. You can change the default hotkey by going to Tools➾Options➾Integration.
How KeePass finds matching entries and why you should care
The automatic hotkey option has some limitations. KeePass does not have reliable access to internal GUI elements of external windows. For example, it cannot reliably access the address field of a web browser. It does have reliable access to window titles. That is what KeePass uses to identify windows. Window titles are not as reliable as URLs for matching since they may be somewhat generic. However, most webpages do use the name of the site in the title of their pages. For example, the title of the Amazon sign-in page is just that: Amazon Sign In.
Let us look at the other side of the equation. KeePass knows the title of the active window. Now it needs to decide which of the KeePass database entries should be used. Since URL matching is out of the question, entry titles are used instead. KeePass takes the title of each of the entries in the database and tries to match each of them with the window title.
- Entry
- Username, password, URL, etc, for a particular form
- Title
- The name or label for an entry
The title matching behavior of KeePass allows it to support auto-type on a large number of sites without the need for any configuration. But it also causes some confusion when it does not work. Many users dub auto-type as unreliable and give up on it. But auto-type can be made to work by adjusting the title or by explicitly specifying window names. The topic of window names is discussed later in the article.
info: The primary purpose of an entry title is to help you to identify entries in the KeePass UI. It is better to choose titles that makes sense to you. If a title is not compatible with the form you are trying to fill, use the window name option to override the title.
Matching Rules for titles
A perfect match is not required. If the title of the entry appears somewhere in the title of the window, it is considered a successful match. For example, if the title of the entry is Google, it will match the Sign in to your Google Account
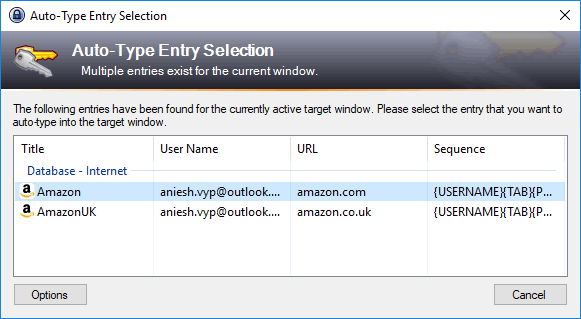
window. But if the title of the entry is Google Work, the match will fail. If KeePass finds more than one suitable entry, it displays a window asking you to choose.
Window name, key sequence pairs
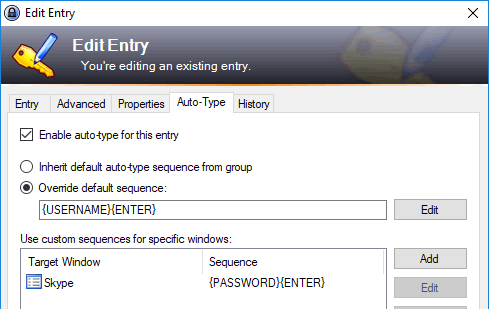
As we have seen before, entry titles help KeePass in matching the entries with windows. But this is rather restrictive. What happens if the window has a generic name like login? What if a website has a multi-page login system? We don’t have to rely on titles alone for entry identification. KeePass has the option of adding window titles to an entry. Each of these windows can have its own custom key sequence as well. The Add window name option is available in the Auto-Type tab of the Edit Entry window.
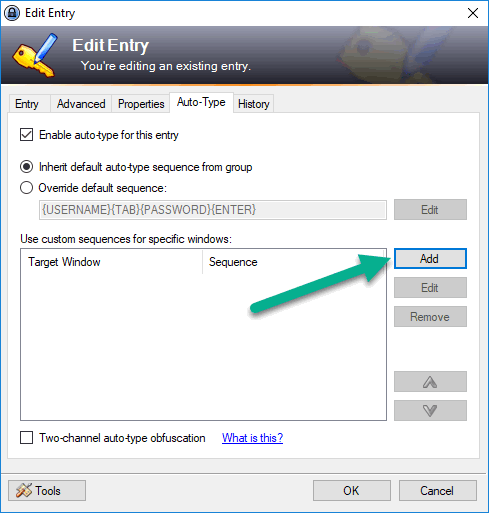
Click on the Add button to add Window, Key-sequence pairs.
Matching Rules
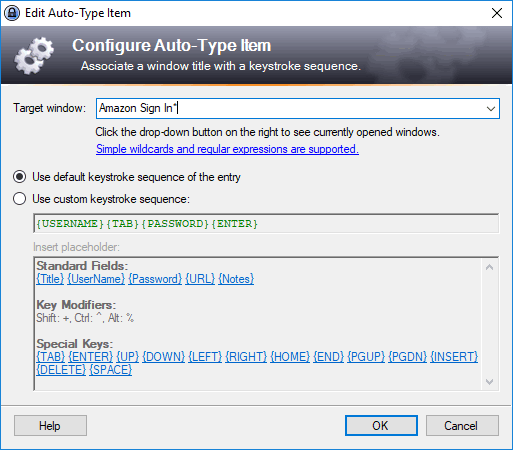
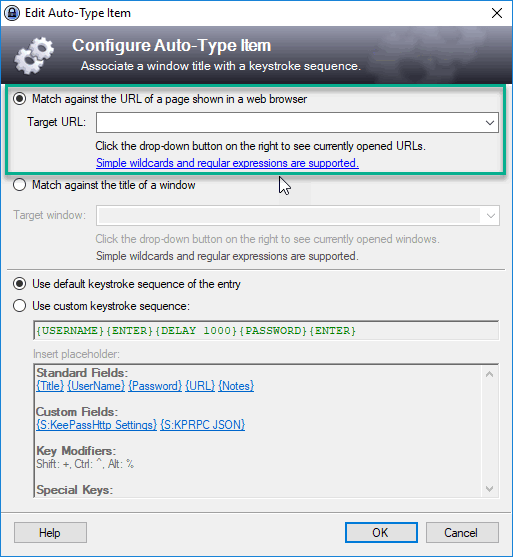
The matching rules are different for window title matching. There must be a perfect match between the window titles. That is, between the one we specify here and the actual title of the target window. For example, the string “Amazon Sign In” will not match the window title “Amazon Sign In – Google Chrome”. KeePass supports wild cards to make such matching possible. The wildcard asterisk character will match any string including an empty string. If we specify “Amazon Sign In*” as the window title, it will match “Amazon Sign In – Google Chrome”, “Amazon Sign In – Firefox”, “Amazon Sign In”, etc.
Regular Expressions
KeePass also supports the use of regular expressions. Enclose the string using double forward slashes (//) to tell KeePass to interpret the string as a regular expression. For example, the regular expression pattern //Amazon Sign In.*// matches the Amazon Sign In windows mentioned above. Regular expressions are very powerful once you learn to use them. They are overkill for a simple case like this though.
tip: We also have the option to add different key sequences to each window title. Custom key sequences are discussed in detail in the next main section.
Two-channel Auto-Type obfuscation
Another option that is available in the Auto-Type tab is Two-channel Auto-Type obfuscation. By default, KeePass sends simulated keypresses to the target window. If Two-channel Auto-Type obfuscation is enabled, it uses a combination of keypresses and copy-paste instead. Some of the characters are sent using key presses, the remaining ones are sent using copy and paste. This improves security, so it is better to turn this option on. It does not work on all windows though.
The problem of duplicates
Adding window names to the entry can help with windows with generic names like login, but there are a couple of issues to be aware of. It is possible that more than one site has such generic page titles. This leads to duplicate window names in the database. KeePass shows a selection window if it hits duplicates during a search. The required entry will have to be selected manually from this selection box.
There is also the risk of sending the wrong credentials if we are not careful. An entry with a generic window name is an entry that can match a lot of windows. Once we create one of those, we need to be careful with all the windows with that name. Before invoking auto-type on a window with a generic title, we have to be sure that there is an entry matching the window in the database. Otherwise, KeePass may choose the entry for another window instead.
Custom keystroke sequences
Certain windows require custom keystroke sequences to be defined. Take a look at the login screen of Skype.
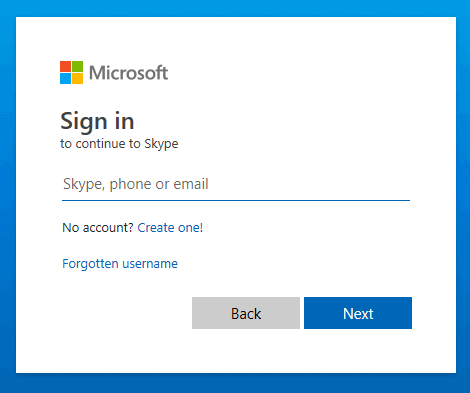
The first screen asks for only the username. We need to get past this screen first, before entering the password. One option we have is to make separate window name entries for each screen. Or we could get more adventurous and try to do it with a single custom keystroke sequence. Either way, we need to customize the keystroke sequence.
Using a single key sequence
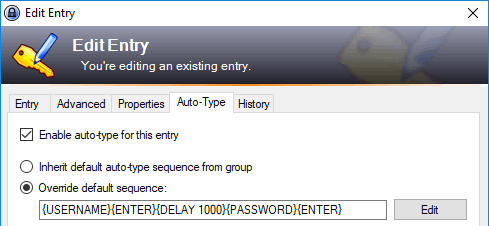
Let us look at the single sequence option first. The sequence {USERNAME}{ENTER} will get you past the first screen. But if this is followed immediately by {PASSWORD}{ENTER}, the sequence might fail. This is because there might be a slight delay before the password screen appear. We might end up sending keystrokes to a window that is not yet ready to accept input. KeePass has a special placeholder {DELAY milliseconds} that delays keystrokes; which is handy for this situation. Put the delay in the middle of the sequence like so, {USERNAME}{ENTER}{DELAY 1000}{PASSWORD}{ENTER}. This will make KeePass wait 1000 milliseconds before sending the password. The delay value will have to be adjusted depending on the window in question.
Using two key sequences
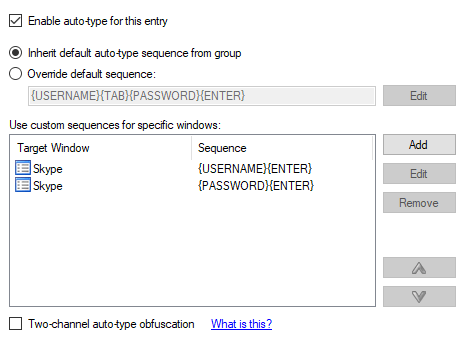
Let us look at the double window name option. I have added a {USERNAME}{ENTER} key sequence and a {PASSWORD}{ENTER} key sequence as shown below. I had to use Skype as the window title for both, as the title does not change in the actual Skype window.
KeePass showed the following selection window when the auto-type hotkey was pressed.
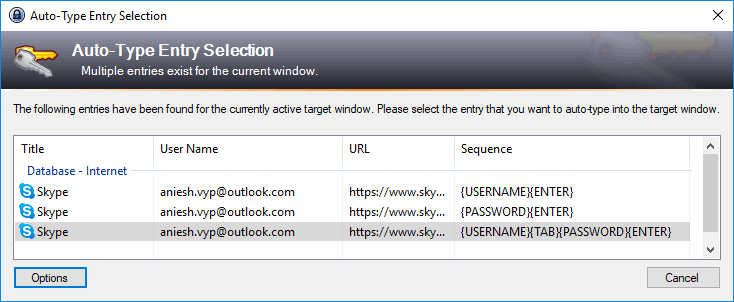
As you can see it worked, but there is a slight problem. We had added only two sequences, KeePass is showing us three. Note that the extra key sequence is the default one. This happens because KeePass is trying to match the title of the entry as well, along with the two window titles which we added. The title of the entry was also Skype. We can get around this little problem by changing the entry title; for example to something like Skype Windows 10. Or we could delete one of the key sequences and pair it with the entry title as shown below.
What about those pesky windows which ask you to enter a captcha just to sign-in? The captcha has to be entered manually, but the rest can be handled with a key sequence. Enter the captcha first, then move to the first field and press the auto-type hotkey. An extra {TAB} in the key sequence may have to be used to skip over the captcha field.
Alternatives
Not convinced that auto-type is the right solution for you? Here is a very brief look at some of the plugin-based alternatives. These tend to be more convenient but may not be as secure as pure KeePass. The main idea behind the alternatives is to access the address field of the browser somehow or other. This allows for more accurate matching and the need for configuring KeePass entries is minimized.
KeePass plugin, Browser plugin combos
This may be the most convenient option once you set it up. It involves installing plugins that can interact with each other in both the Browser and KeePass. The browser plugin has access to the URL of the current page. This URL is sent to the KeePass plugin, which can then pinpoint matching entries, using the URL field of the KeePass entry.
One drawback of such plugins is that even popular plugins often get abandoned. At the time of writing this article, there are no well-established plugins available. Actively developed plugins are fairly new. Kee plugin created by the same guy who created Keefox seems to be the most promising one. It is available for both Firefox and Chrome. KeePass Tusk for chrome also seems to be quite popular.
KeePassXC
KeePassXC is a cross-platform port of KeePass. It supports the KeePass database format and ships with browser plugins. So there is no need to hunt for third-party plugins. On Linux, KeePassXC is supposed to work better than KeePass.
WebAutoType Plugin
The WebAuto Type plugin takes a different approach; it is a KeePass only plugin without a browser counterpart. It enhances auto-type but does not replace it. I mentioned earlier that external applications like KeePass do not have reliable access to the address field of a browser. External applications may be able to access the address field using accessibility tools; this requires accessibility features to be enabled in the browser. At the time of writing this article, it works reliably with Firefox. Chrome works only if started with the switch –force-renderer-accessibility.
Here is how WebAuto Type plugin works. When the user presses the auto-type hotkey, WebAuto Type plugin attempts to access the URL from the browser. If it succeeds it does a URL match. If it fails, it hands control to KeePass; which does its usual window title matching.
You are not restricted to just the one URL from the main entry tab. WebAuto Type adds an option to add more URLs to your entry. This works similar to the additional window name option described earlier.
Browser plugins to add URL to the window title
This is perhaps the most interesting approach. There are browser plugins which add the URL of the current page to the window title. Once this is done, window title matching becomes as good as URL matching. Some such plugins can be found here.